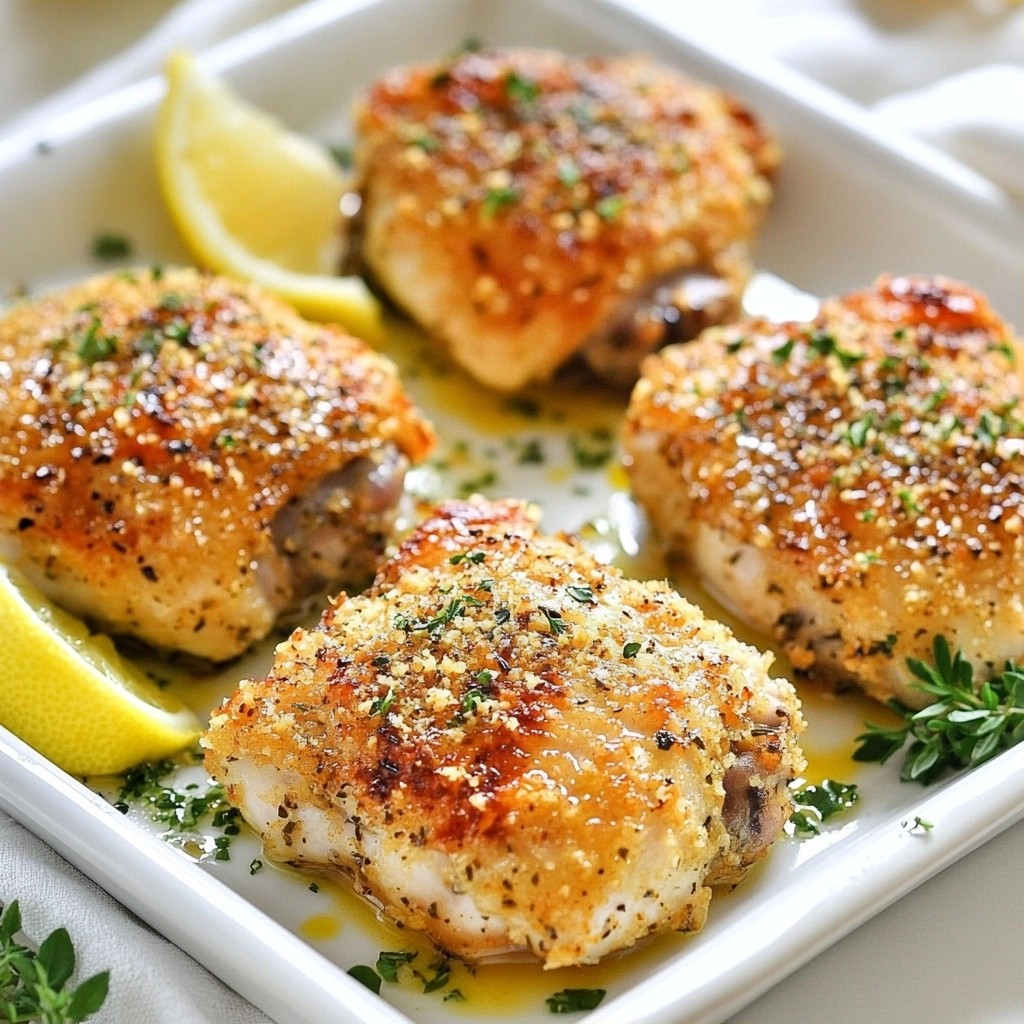
Are you ready to savor a crunchy baked chicken that is both simple and tasty? This Garlic Herb Crust recipe will have your family asking for seconds. With a few fresh ingredients and easy steps, you’ll create a meal that’s crispy on the outside and juicy inside. Join me as I guide you through this delicious dish that’s sure to impress at any dinner table!
Why I Love This Recipe
- Flavorful Crust: The combination of garlic, herbs, and Parmesan creates a deliciously crunchy and flavorful crust that elevates the chicken.
- Healthier Option: Baking the chicken instead of frying allows you to enjoy a crispy texture without the extra oil and calories.
- Easy Preparation: This recipe requires minimal prep time and uses simple ingredients, making it perfect for a weeknight dinner.
- Customizable: You can easily swap out the herbs or add your favorite spices to make this dish your own!
Ingredients
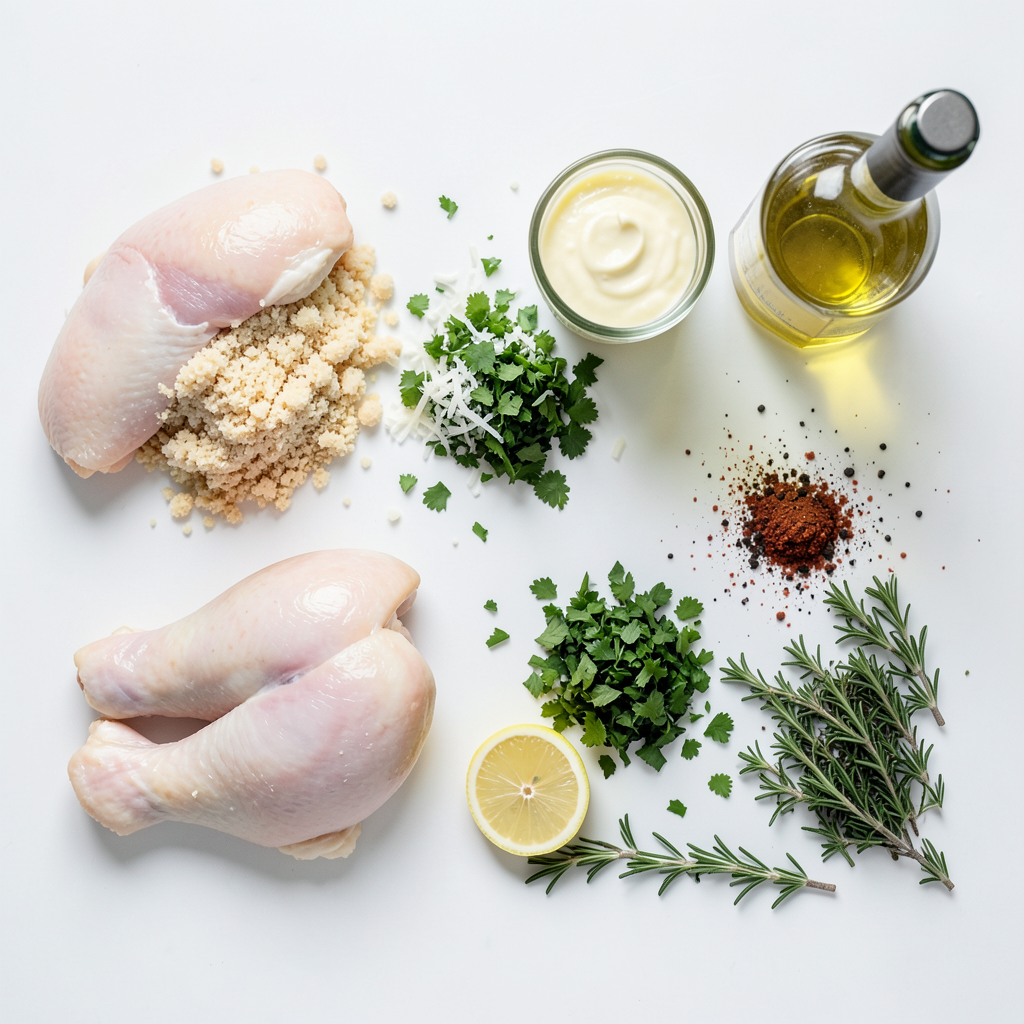
List of Ingredients
- 4 chicken thighs (bone-in, skin-on)
- 1 cup panko breadcrumbs
- 1/2 cup grated Parmesan cheese
- 4 cloves garlic, minced
- 1 tablespoon fresh parsley, chopped
- 1 tablespoon fresh thyme leaves
- 1 tablespoon fresh rosemary, chopped
- 1 teaspoon salt
- 1/2 teaspoon black pepper
- 1/2 teaspoon paprika
- 2 tablespoons olive oil
- 1/4 cup mayonnaise
- Zest of 1 lemon
Measurement Details
Each ingredient plays a key role in the flavor and texture of this dish. The chicken thighs provide moistness and richness. Panko breadcrumbs give a light, crunchy crust. Grated Parmesan adds a savory note. Fresh garlic, parsley, thyme, and rosemary bring a burst of flavor. Salt, black pepper, and paprika enhance the taste. Olive oil ensures the crust sticks, while mayonnaise adds creaminess. Finally, lemon zest brightens the dish.
Substitutions for Ingredients
You can swap chicken thighs for chicken breasts if you prefer leaner meat. For a gluten-free option, use gluten-free breadcrumbs instead of panko. If you lack Parmesan, you can try using any hard cheese like Pecorino. Fresh herbs can be replaced with dried herbs, but use less since dried herbs are stronger. If you want a dairy-free option, substitute mayonnaise with a vegan alternative.
Step-by-Step Instructions
Preheating the Oven and Preparing the Baking Sheet
First, set your oven to 425°F (220°C). This high heat helps the chicken get crispy. While the oven heats, line a baking sheet with parchment paper. This makes cleanup easy and keeps the chicken from sticking.
Preparing the Breadcrumb and Herb Mixture
In a small bowl, combine these dry ingredients:
- 1 cup panko breadcrumbs
- 1/2 cup grated Parmesan cheese
- 4 cloves garlic, minced
- 1 tablespoon fresh parsley, chopped
- 1 tablespoon fresh thyme leaves
- 1 tablespoon fresh rosemary, chopped
- 1 teaspoon salt
- 1/2 teaspoon black pepper
- 1/2 teaspoon paprika
Mix them well with a spoon. This mixture adds great flavor and crunch to your chicken.
Creating the Creamy Mixture for Coating
Next, take another bowl to make the creamy coating. Mix together:
- 2 tablespoons olive oil
- 1/4 cup mayonnaise
- Zest of 1 lemon
This mix helps the breadcrumb layer stick to the chicken. Make sure it’s smooth and well combined.
Now you are ready to coat your chicken thighs and bake them to crunchy perfection!
Tips & Tricks
How to Ensure Maximum Crispiness
To get your chicken extra crispy, use panko breadcrumbs. They are light and airy. This helps create a great crunch. Make sure to press the breadcrumbs onto the chicken firmly. This helps them stick well. You can also broil the chicken for a few minutes at the end for added crispiness. Just keep an eye on it to avoid burning.
Best Practices for Seasoning
Seasoning is key for flavor. Start with a mix of salt, black pepper, and paprika. These spices add depth. Fresh herbs like parsley, thyme, and rosemary bring bright flavors. Be sure to mix them into the breadcrumb mix. Rub the creamy mixture on the chicken well, so the spices adhere better. This way, every bite is packed with taste.
Resting Time for Perfectly Cooked Chicken
Letting your chicken rest is very important. After baking, take it out and let it sit for about five minutes. This allows the juices to settle. If you cut too soon, the juices run out, making it dry. Resting keeps your chicken juicy and tender, giving you the best bite possible.
Pro Tips
- Use Fresh Herbs: Fresh herbs enhance the flavor of the crust, giving the chicken a vibrant taste. If possible, opt for fresh over dried for the best results.
- Pat Chicken Dry: Ensuring the chicken is dry before applying the creamy mixture helps the crust adhere better, resulting in a crunchier texture.
- Experiment with Spices: Feel free to add your favorite spices to the breadcrumb mixture for a personalized flavor profile, such as cayenne for heat or Italian seasoning for a herby kick.
- Let it Rest: Allowing the chicken to rest for a few minutes after baking helps the juices redistribute, ensuring each bite is moist and flavorful.
Variations
Spicy Garlic Herb Crust
Add heat to your garlic herb crust with some spices. Mix in 1 teaspoon of cayenne pepper or red pepper flakes. This will give your chicken a nice kick. You can also use a spicy seasoning blend. This variation works well if you enjoy bold flavors. Serve it with a cooling dip, like yogurt or ranch, to balance the spice.
Alternative Protein Options
You can use other proteins for this dish. Try bone-in, skin-on chicken breasts for a leaner choice. If you prefer turkey, bone-in thighs work great too. For a seafood option, use thick fish fillets like salmon. Just adjust the cooking time for fish, as it cooks faster than chicken. These options keep the same crunchy texture you love.
Vegetarian Adaptation Ideas
For a vegetarian twist, replace chicken with hearty vegetables. Try large portobello mushrooms or eggplant slices. Coat them in the same creamy mixture before adding the breadcrumb mix. Bake until golden brown for a tasty meal. You can even use tofu for a protein-rich option. Press it to remove excess water, then follow the same steps. These adaptations ensure everyone can enjoy this dish.
Storage Info
How to Store Leftovers
To keep your crunchy baked chicken fresh, let it cool first. Once cooled, place the chicken in an airtight container. You can store it in the fridge for up to three days. Make sure to keep it covered to prevent it from drying out.
Freezing and Reheating Instructions
If you want to save some for later, you can freeze the chicken. Wrap each piece tightly in plastic wrap, then place it in a freezer bag. This helps keep it fresh for up to three months. When you're ready to eat, thaw it in the fridge overnight. Reheat in the oven at 350°F (175°C) for about 20-25 minutes. This keeps the skin crispy.
Best Container Types for Storage
For best results, use glass or plastic containers with tight lids. These types of containers help keep moisture in while keeping air out. If you prefer to freeze, use freezer-safe bags or containers to avoid freezer burn. Always label your containers with the date for easy tracking.
FAQs
How long does it take to bake chicken thighs?
It takes about 35-40 minutes to bake chicken thighs at 425°F (220°C). You want the skin to turn golden brown. Always check the chicken's internal temperature. It should reach 165°F (75°C). This ensures the chicken is safe to eat.
Can I use different herbs in the crust?
Yes, you can mix and match herbs in the crust. Consider using oregano, basil, or dill. Fresh herbs add great flavor. Dried herbs work too, but use less since they are stronger. Experiment with what you have on hand for a unique taste.
What is the best way to check if the chicken is cooked?
The best way to check if the chicken is cooked is by using a meat thermometer. Insert it into the thickest part of the thigh without touching the bone. If it reads 165°F (75°C), the chicken is done. If you don’t have a thermometer, cut into the chicken. The juices should run clear, not pink.
This post covered what you need to know for baking chicken thighs. You learned about the ingredients, measurements, and substitutes. We also shared steps for making your dish crispy and tasty. Variations let you explore different flavors and protein options. Plus, we discussed how to store leftovers properly.
In conclusion, these tips simplify cooking and storage, ensuring delicious results every time. Enjoy your tasty chicken!